Impact Test Apparatus Model MT 094
Home » Products » Impact Test Apparatus Model MT 094
Impact Test Apparatus Model MT 094
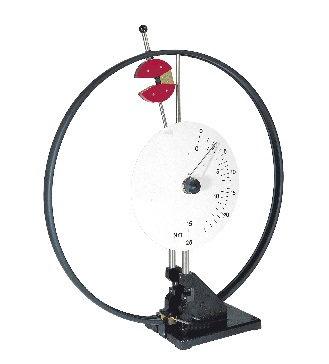
Sci-tech Impact Test Apparatus Model MT 094 experimental unit is a solid-pendulum impact tester, designed for the Charpy notched-bar impact test. The clean layout and simple operation mean the experimental sequence can be observed in all details and phases.
In the experiment, the hammer attached to a pendulum arm describes an arc. At the lowest point of the hammer path, the hammer transfers part of its kinetic energy to the notched specimen. The specimen is either destroyed or bent by the impact and pushed between the supports.
The notched-bar impact work required to deform the specimen is read directly off a large scale.
In order to vary the output energy, the mass of the hammer can be changed by adding or removing weights.
A brake reduces the residual energy of the hammer on each swing until it reaches zero.
A protective ring ensures the experiments can be conducted safely while also fixing the hammer in place. The hammer is triggered with two hands for safer operation.
The experimental results allow quality control and an analysis of the fracture behavior of different metallic materials. Non-metallic specimens can also be used. Specimens with different notch geometries, in different materials and specimen dimensions are included in the scope of delivery.
| Size: | 100cm x 30cm x 100cm (LxWxH) |
| Weight: | 45 kg |
Item Description
Features
- Charpy notched-bar impact test
- Classic method from destructive materials testing for quality control and analysis of the fracture behavior of metallic materials.
In the field of industrial quality control, the impact test is a widely used test method with which to quickly and easily determine characteristics for a material or component analysis.
Sci-tech Impact Test Apparatus Model MT 094 experimental unit is a solid-pendulum impact tester, designed for the Charpy notched-bar impact test. The clean layout and simple operation mean the experimental sequence can be observed in all details and phases.
In the experiment, the hammer attached to a pendulum arm describes an arc. At the lowest point of the hammer path, the hammer transfers part of its kinetic energy to the notched specimen. The specimen is either destroyed or bent by the impact and pushed between the supports.
The notched-bar impact work required to deform the specimen is read directly off a large scale.
In order to vary the output energy, the mass of the hammer can be changed by adding or removing weights.
A brake reduces the residual energy of the hammer on each swing until it reaches zero.
A protective ring ensures the experiments can be conducted safely while also fixing the hammer in place. The hammer is triggered with two hands for safer operation.
The experimental results allow quality control and an analysis of the fracture behavior of different metallic materials. Non-metallic specimens can also be used. Specimens with different notch geometries, in different materials and specimen dimensions are included in the scope of delivery.
See also different:

Sci-tech Material Testing Apparatus 50kN Model MT 157, in conjunction with the accessories, offers experiments from destructive materials testing. The clean layout and simple operation mean the experimental sequence can be observed in all deta [...]

Salient Features Ø Aesthetically designed injection molded electronic desk. Ø Master unit carrying useful experiment resources like line Synchronized firing circuits, Power supplies, lamp load, RLC loads, Battery Charging supply etc. while t [...]


